Discovery Channel Canada’s “Daily Planet” segment: https://www.youtube.com/watch?v=ENPVkKDqYiE (very similar to the walkthrough above)
Update 7/31/2015:
New installation guide has been posted here:
The purpose of this project was to allow my roommates and friends to be able to drink as much beer from the kegerator as they’d like, without guesstimating who owes what when it comes time to refill the kegs. The system uses two flow meters in the beer lines to detect when beer is poured, and once a pour has started, the raspi camera module turns on to run facial recognition (disabled when I shot this video) and charge the appropriate user for their beer. I wanted the system to be as passive as possible, requiring zero human interaction (no RFID cards, no selecting the user every time) but to record all pours and how much was poured. So far the system is running great, minus that accidental spill because my tap handles are too close together 🙂
Eventually I’d like to use weight sensors under each keg to get a better estimation of keg volume, and use a liquid probe thermometer to better estimate the temperature of the beer instead of the air. I’m also moving to a NOIR pi camera module after finding it had much better low light performance, and I’ll probably add some IR lamps to help illuminate the face for recognition when the lights are off. I also need to mount the camera a bit better, ideally higher and a littler further behind the tower, but the flex arm tripod worked great for this first implementation.
I’m also working on a new UI that will probably look something like this:
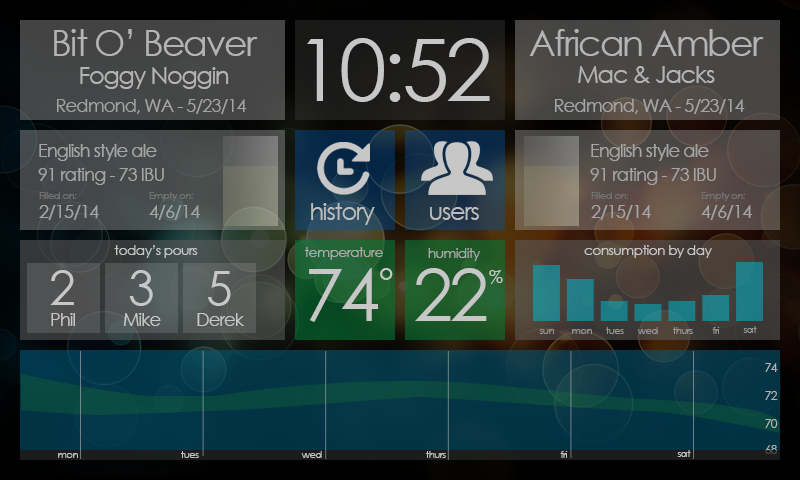
Mock up UI v2
The source is currently avilable at https://www.assembla.com/code/smartkegerator/subversion/nodes/ but it’s certainly not finished or polished.
The UI is written in QT and C++, using python scripts for the gpio flow interrupts (the c++ interrupts seemed unreliable,but python’s implementation worked perfectly) and the C loldht script found on these forums to read the temp from the temp/humidity sensor.
I’ve made a quick and dirty fritzing image to illustrate the connections, but I’m not very good with frizing so I’ve included text as well.
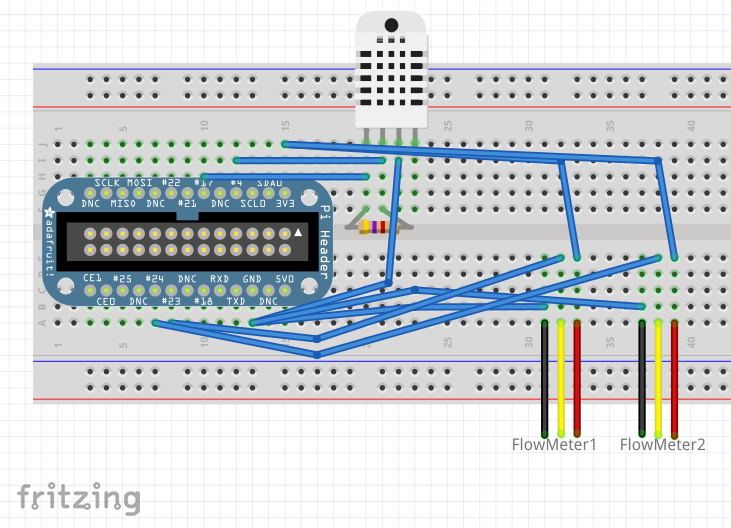
On each flow meter, I connected the red to the pi’s 3.3v, black to ground, and the yellow pin to GPIO #23 and GPIO #24 for left and right sides respectively.
The temperature sensor, looking at the front of it (the side with the holes) the pins go left to right 1-4. Pin 1 to GPIO #17, so that I can turn it on/off by writing power out on pin 17. Pin 2 to GPIO #4. Pin 3 to ground. And lastly put a 4.7k ohm resistor between pins 1 and 2.
Parts:
Rasperry pi
http://www.amazon.com/RASPBERRY-MODEL-756-8308-Raspberry-Pi/dp/B009SQQF9C/ref=sr_1_1?ie=UTF8&qid=1394450356&sr=8-1&keywords=raspberry+pi
Mimo 720S display
http://www.amazon.com/Powered-Slide-out-Touch-Screen-Monitor/dp/B002QFP4Z8/ref=sr_1_1?ie=UTF8&qid=1394450430&sr=8-1&keywords=mimo+720s
Powered USB Hub
http://www.amazon.com/gp/product/B005A0B3FG/ref=oh_details_o05_s01_i00?ie=UTF8&psc=1
DHT22 temp/humidity sensor
https://www.adafruit.com/products/385
Flow meters
http://www.adafruit.com/products/828
Pi Camera module (NOIR seems ideal for low light)
http://www.amazon.com/Raspberry-Pi-Camera-Filter-Vision/dp/B00G76YEU8/ref=sr_1_1?ie=UTF8&qid=1394450401&sr=8-1&keywords=raspberry+pi+noir
100cm SPI cable (raspi camera cable)
http://www.ebay.com/itm/141129552486?var=440222309796&ssPageName=STRK:MEWNX:IT&_trksid=p3984.m1497.l2649
Camera housing
http://www.amazon.com/gp/product/B00E1UOXMQ/ref=oh_details_o06_s00_i00?ie=UTF8&psc=1
Wide-angle lens
http://www.amazon.com/gp/product/B009NED5E2/ref=oh_details_o00_s00_i00?ie=UTF8&psc=1
Techflex cable sleeve(I think it makes the raspi camera cable better looking)
http://www.amazon.com/gp/product/B007VT6HSC/ref=oh_details_o02_s00_i00?ie=UTF8&psc=1
For the gpio breakout:
10 pin ribbon cable
http://www.ebay.com/itm/281152427395?ssPageName=STRK:MEWNX:IT&_trksid=p3984.m1497.l2649
10 pin connectors
http://www.ebay.com/itm/171047381713?ssPageName=STRK:MEWNX:IT&_trksid=p3984.m1497.l2649
protoboard from radioshack
http://www.radioshack.com/product/index.jsp?productId=2104052
References:
Mimo 720S solution – http://www.raspberrypi.org/phpBB3/viewtopic.php?t=27781
Raspberry pi camera to opencv/facial recognition – http://thinkrpi.wordpress.com/opencv-and-pi-camera-board/
More info coming soon!

Pingback: Smart Kegerator Bills Based on Beer Consumption
$2,37 for one beer? What the hell man? You can buy V.I.P beer in Biedronka for $0.65 and it contains 7% of alcohol.
Hi kgaop! Unfortunately, at the small scale I’m buying these microbrews, the price per pint is what is displayed. I have a smaller kegerator, so to fit two different beers, I can only use 5 gallon kegs. Those 5 gallons are anywhere from $50-$100 to fill (for the beer I want), with the two beers I had in the video being $85, and $100 to fill respectively.
You don’t save any money over bottles buying those tiny kegs. You do save on CRV which adds up over time, but then you’re infrequently buying CO2 as well and the draft beer is better by most beer snob’s criteria.
I’ve got a kegerator as well and I’ve never got anything other than 13.2 or 15.5 gallon kegs depending on the brewery. But then again, I’ve only had one thing on tap unless the second keg is on ice.
Awesome project, if I thought my friends would actually give me any money, I would totally get that setup! Great job!!
Have you measured the beer temp? 35 is really cold for good microbrew, fine for macrobrew, but the good stuff, I’ve found much better flavor keeping the keg temp about 42 and finding it dispenses at about that temp as well. Might require longer beverage line, at least 5 feet but often more and you run the correct pressure too.
Thanks Kevin! I’m still not entirely sure how payments will be collected, but I just got the system in place and don’t plan on charging until the system is error free, so I will be working that out soon.
The initial reason for getting a kegerator is that my favorite beer’s brewery (Mac & Jacks) does not do any bottling whatsoever. They won’t even fill sanke 5 gallon kegs, instead using only a supplied corny keg with ball lock connectors. It was an annoyance at first but now that everything’s hooked up it’s fine and worth it for me. If I bought a 1/2 barrel keg instead the price per beer is cut in half, but it means I can only have one beer on tap. I will probably do that from time to time, but while I was starting to test and use the system, I wanted to have two beers on tap.
The temp I have displayed right now is the air temp of the cabinet, at least according to the DHT22, but I find the beer temp stays right about 39. I know some people like theirs a couple degrees warmer, but I’ve found 38-40 is my preference for Mac & Jacks, and whatever the second beer is just has to deal with that temp 🙂
This is amazing. I was looking into getting a kegerator for my apartment and I have a friend who is constantly drinking my beer and never pays me back for anything. This would be a great way to keep track. I currently have another friend studying in hardware engineering and this would be a great project for us to work on. I would love to contribute possibly!
Thanks Justin! The source is all there for you guys to tinker! I should probably move my code to github to help with contributions, but if you’d like assembla access just email your credentials.
Hi phil, I just want to let you know I sent you an email. 🙂
Great job Phil. We’ve made some really accurate flowmeter readings interposing an Arduino to deal with those interrupts at Carriots: https://www.carriots.com/cool_project/flowmeter
Very cool! I do aim to get the flow meter readings more accurate, and I think I’ll need to move them off to an arduino for when the raspberry pi’s cpu is busy. I will check this out then! Thanks!
Do you include your source for the arduino? I couldn’t find it anywhere. I wish I could make cool videos like that one tho! )
Have you considered using/adding to Kegbot http://kegbot.org)? They’ve been doing exactly this (“smart kegerator” with flow sensor tracking) for a while.
Hi beerit, the Kegbot is built on an entirely differnt platform. I wanted to use my raspberry pi, so that meant creating it from scratch (more fun!) and my system uses facial recognition instead of nfc/rfid tags, and does not publish the pours online. The two projects’ goals are considerably differnt so I’m sharing my particular solution in hopes of helping others with similar goals.
Phil, great job. Have you considered lose in weight as another method of tracking? As a former bar manager, this is how I accurately measured the contents of a keg for inventory purposes
So this question is coming from a complete beginner. Why did you chose to use a Raspberry Pi instead of an Arduino? Cool project!
Thanks! The arduino wouldn’t be capable of doing the facial recognition and video processing I use in my system. I considered using an arduino to interface the flow meters, but I’ve found the pi handles the interrupts well enough that I don’t need it. I want more accuracy though, so I will probably incorporate one in the near future as well as change to the swissflow meters
If you could figure out a way to stop the beer from flowing then this would be good for families to stop the kids drinking beer if no recognisable face is seen. Or to cut someone off if they are too greedy.
Great Idea – Beer will only flow for recognized faces – and/or establish a limit of so many beers an hour, day whatever – this has major possibilities
You should drop a Patent on it, the F&B business would love it.
Thanks, but I don’t think anything I’ve done here is patent-able, and I want others to be able to use my source if it helps them!
Hi Phil. Awesome project! I’m astounded by your facial recognition speed. I’m currently building a project needing object recognition and Haarcascades seems like a good solution, except it’s running at 4FPS on a 128×128 picture… part of that is probably because it’s written in Python, I’ll dig through your code and try to make it work with my project, thanks for publishing your source.
Cheers 🙂
Thanks solenoid! Python could certainly have something to do with it (my code is all c/c++) but you might also want to check out which cascade file you’re using. There are some faster, less accurate algorithms you might be able to swap in and improve the framerate. In my source I have a “quick” and normal cascade, and found the normal one was fast enough for me, but you might want to use the “quick” one
I did a quick scan of the source files – a readme.txt would help.
For example I couldn’t find the python sources you mentioned.
I’m the author of v3c-raspi at sourceforge – do you still have the C/C++ interrupt sources you had reliability problems with?
I’m doing a solder reflow oven project that will use my Android phone as the UI with Qt – how were you planning on implenting the graph widget in the mock-up?
Hi Philip, the code was put up hastily before I was 100% ready, but I felt putting it up with less documentation is better than never putting it up, waiting on me writing the documentation 🙂 I’ll eventually add some more help files.
The python interrupt code is in the external folder, called gpioWFI.py.
I might have the old interrupt code in one of the revisions of mainwindow.cpp, but it was pretty straightforward so I could whip it up again if you’d like. The problem I was having is that after a pour, I would get interrupts every 4 seconds indefinitely until I poured again, after which it would slowly tick again. The python implementation seems to never exhibit this problem, but I never found the real problem, just found something that worked and moved on. (It was late at night, and I just wanted it to work!)
I planned on using QWT to draw the graphs. The current graph is quick crummy code I whipped up, but QWT seems like a reasonably full-fledged graphing library with lots of examples online, I just have to get around to implementing it 🙂
Let me know if you’d like me to send you a small sample of the way I was using the c++ interrupts.
Since my comment I tried Apache WebSockets one last time and it worked! It turns out that all the bleeding edge browsers use obsolete websocket protocols which I didn’t enable.
I’m going to do a Tony Stark and control/monitor it all from my Android phone.
“I’m going to need your displays”.
I didn’t know you could do C/C++ interrupts on the Raspberry Pi – it could be a useful addition to v3c-raspi – sure, send me a copy and I’ll see if I can sort it out.
Phil,
This looks great. I was wondering if you have any plans drawn out to show connections to go with the source code?
Hi Namoh21,
I don’t currently, but I could draw something up for you. What pieces did you want to see?
Well, I’m new to Raspberry pi setups. I do have the adafruit flow sensors. I was just interested in how the circuit board looks and where the flow sensor signal wire plugs into what pin for the RPi.
I will work on a schematic and put it on this post and will comment when it’s up!
Hi Namoh21, Sorry for the delay. I’ve added a quick fritizing image and a text writeup in the middle of the post above. Let me know if you have any more questions!
Having trouble getting the program to compile as it should. New to Linux, but hoping to get this awesomeness up and running ASAP. Any readme docs or assistance would be greatly appreciated!
Hey Nick,
Are you having any specific problems? I followed the linked tutorials for facial recognition first, so maybe your’re missing the facial rec stuff? I’m not terribly well versed in linux either, so I don’t know how much I could help but I’ll try!
I have used qmake to create a Makefile. After using the make command the file gets hung up on one of the headers and gives me a fatal error. I could be going in the wrong direction to begin with. Trying to figure out how to get from the .pro file to be able to compile and build the program for install.
Are you not building it in QTCreator? If you open the project in QTCreator and click build, you shouldn’t have any real issues unless the facial rec files are missing. I could have dependencies on the RaspiVid headers as well, but I can check that tonight.
opencv2/core/core.hpp: No such file or directory is my issue of getting hung up.
Hi Nick,
I followed the guide here: http://thinkrpi.wordpress.com/2013/04/05/step-3-install-softwares-for-webcam-and-computer-vision/
I would try running:
sudo apt-get install libopencv-dev
sudo apt-get install python-opencv
Although python’s opencv is not necessary for my application.
awesome! Thanks! Finally got it built after a few issues. Now to poke around and find everything we need to change for us! Thanks for your work!
Glad you got it working! If you can remember any of the hiccups you faced, sharing their fixes here would help others in the future!
What did you have planned for changes? I’m a few days away from checking in the v2 main screen update, with the other pages to follow, if you wanted to integrate any of that.
Most of the hiccups were just minor issues — changing directories to match mine, continually installing different things that I didn’t have quite yet. The biggest issue was libfacerec-0.04 did not compile correctly the first time giving me a lot of file not founds. After removing it, adding it back, and recompiling it worked.
For now, I only have the program running. Nothing is wired up yet.The mimo isn’t working yet. So I will begin googling to figure all of that out now.
How do we change the types of beer? I tried updating it in the beers.txt, but didn’t seem to do the trick.
There are two kegs displayed, specified by KegId at the top of the kegs.txt file. Those kegs have a BeerId. That BeerId is which beer from beers.txt the keg is full of. Iseparated them early on to help with data querys in the future.
If you’re still not seeing the changes you make, make sure the config.txt is pointing to the right files.
Hey Phil. After some struggle, I think we ready to do with the mimo! Last thing to do is figure out how to wire up these flow meters and sensors. As requested by someone before, a schematic would be an awesome addition. Thanks, can’t wait to get this up and running in our office.
Hi Nick, I’ve added a quick fritzing diagram and a text writeup in the middle of the post above. Let me know if you have any other questions!
Hey, what are the requirements that the tablet must have. I’m trying to see if there will be a cheaper option I could use? Thanks.
Hi Nick, I’m using a raspberry pi, not a tablet. You could likely build something similar with a tablet, but none of the code I wrote would easily work on a tablet (My Qt code wouldn’t run on android without a ton of work)
Thanks for the quick response. Sorry, I don’t think I was very clear. I was referring to the Mimo display. Are there other options? It is now running at $200 on Amazon. Didn’t know if you knew of alternatives? There are much cheaper Android touch screen tablets. I don’t know how the displaying works, though. Thanks again.
For example, what about a touchscreen like this? http://www.amazon.com/Tontec-Raspberry-Display-AT070TN90-Touchscreen/dp/B00HNLXZHO
That screen should work fine, just ignore the steps to setup the mimo and figure out how to get that screen working and you should be good to go!
Thanks, you’re the man. A few more questions:
a) That particular screen says it uses an HDMI (which the RP has) but does that mean I won’t need the USB hub?
b) Also, I’m going to build it without the camera for now. Is it possible to disable the camera feature?
a) I’m not sure. It looks like the display is externally powered, so the usb device shouldn’t be drawing much current and my guess is that you wouldn’t need a powered hub, but I can’t be sure without trying it.
b) You definitely could remove it, but you would have to make the necessary code changes yourself. It should be pretty straightforward tho, basically just remove all calls to the RapsiCvCam class, or remove the class altogether.
Thanks again! That helps. Ever thought of adding a feature to tell you how much volume (in ounces or “pours”) left in the keg?
The total volume poured is calculated in code to display the fill level in the UI, so writing that value to a text field should be trivial. See Keg::LitersPoured. The only issue on my setup is that the ounces poured aren’t exact, so I didn’t want to show the exact number, but after using it for several months, the flow readings seem to average out and are very very close to the real output.
Now here’s a real tough one…thought of any way to link how much each user poured to some sort of eCommerce like Square or PayPal?
Not yet 🙂
So does your code now run full facial recognition?
I’m not quite sure what you’re asking. The code released has facial recognition implemented, just in a somewhat early/crude state. The video was done using an even earlier build where facial recognition wasn’t implemented yet.
Sorry, it wasn’t clear. I wasn’t sure if the facial recognition was currently implemented yet. That’s great news.
Pingback: The Raspberry Pi | RSdC
Hi Phil,
Nice project. I see you have hooked the flow meters up with the 3.3v pin, while the adafruit specs (and comment advices) are specifying using the 5v connection. Are you aware of this and is there a specific reason you’re using the flowmeters on the 3.3v pin? (Simply put: Why is this working?)
Thanks rutgerderuiter! I was originally using the 5v from the pi to power the flow sensors, and the 3.3v to power the DHT22, but I wanted to reduce the numbers of wires I needed, and I remembered seeing one example online of someone using 3.3v, so I decided to try it and it worked great! It was safe to try since under-voltage will pretty much never do any damage to a circuit. This freed up a wire running into the cooler compartment which means I can add another sensor using my existing 10-pin cable! A lot of simple components like these flow meters work with a range of voltages, and luckily these work great on 5v or 3.3v.
Hope that makes sense!
Hi Phil, Great execution – I have a few questions that I’d like to ask you via email if you have time. Thanks!
Thanks Monica! I just sent you an email at your wordpress listed email, but in case that didn’t reach you, you can email me at phil (dot) harlow (at) gmail.com
Very cool project. Is the protoboard inside the fridge with the sensors?
Thanks Aaron!
Yes, the protoboard in the fridge holds the temp/humidity sensor and plugs for the flow meters and connects them to the ribbon cable I run inside.
Wow! The software that you created for this is awesome. I am a .Net developer and I really envy what you have done here. I love that you are going to publish the code for this and make it opensource.
Thanks Tyler! I wish I could write this all in .Net! 🙂 Not sure if you knew, but the code is already published and v2 is on the horizon!
Thank you for posting this online as it’s rare to see such a well documented project such as this. I’ve been basing my setup on your design and can’t wait to test out v2 when it is released. That said, do you know if using swissflow sensors require additional code changes or are they essentially the same as the adafruit parts? I have a couple of SF800’s and would like to incorporate those into my build.
Thanks Todd! I don’t know what changes would be required for switching to the Swissflow meters, but briefly looking at the schematics it looks like it should just swap in, assuming it runs on 3v. If it will only run on 5v, you’ll need to use a voltage divider to get the 5v signal down to 3v so the pi can safely handle it. Other than that and calibrating the tickersPerLiter, it should be straight forward. If you encounter any difficulties let me know and I’ll add it to the blog post for others! Thanks!
Just wanted to let you know that I’ve just posted an installation guide for the project. You can find it here:
Any word on a v2.0 release?
Hi Namoh21, I haven’t done a formal writeup as I will be working on a rpi2 optimized version in the following months, but v2.0 is already up and on my assembla page: https://www.assembla.com/code/smartkegerator/subversion/nodes/79/trunk
So, I have been trying to build this program off and on for awhile. I’m having an issue with line 26 in Facialrecognitionmanager.h. I have an error stating “‘Eigenfaces’ does not name a type”. Would you be able to help with this error?
It looks like if I include facerec.cpp, this error is resolved, but I have many more about using a .cpp instead of .hpp.
I’m sure this is something I’m missing that will involve a smack to the forehead….
Hi Namoh21, sadly nothing rings a bell. Looking online, it would seem that including the facerec.cpp is important, just make sure the path you are including actually points to the file. If the file is included properly and you’re getting other errors, its likely just the next thing that needs to be included. I couldn’t really venture a guess without seeing what new errors you’re getting. I will be doing a more detailed writeup from a fresh copy of raspbian to a running SmartKegerator in the following months, but I don’t expect to be finished anytime soon.
If your’e still having troubles, I’ve posted an install guide which should get you to a running SmartKegerator!
Nice Project! congratulation! Look like I alsmost have evrything to start seomthing like this at home and add to my kegerator!
Any tips to help to speed up ramp up ? like what version of QT are you using on the pi? any specific library or advice for a newcommer? Thanks!
Hi Claude! Thanks! Hopefully you’ve gotten a raspberry pi 2 because I’m actively working on a major upgrade requiring the raspi2’s extra horsepower. I’ll also be including a step by step guide to setting up the environment so you can modify the code and troubleshoot problems. That will hopefully come out in the next week or so, I keep putting it off but I’m working on it as I write this!
If you would like anyone to help test the new code out, I know I would be willing to help 🙂
Thanks Brian! I will be finishing up this release in the following weeks and would love some help in tracking down issues/bugs! Make sure to follow the blog and you’ll be the first to know when the new version, and complete installation guide are released!
oh, awesome, exacly what I was looking for to avoid waisting too much time setting up the dev env.
Will wait for this , let talk again in a couple of weeks then 😉
Thanls
Hi Claude,
You can check the new installation guide I just posted and that should walk you through all the required steps to install. Let me know if you encounter any issues or have ideas on how to improve the guide! The code is not totally finished (no training wizard yet) but it is 80% complete and comes with a bunch of new features for the Raspberry Pi 2!
Hi Brian,
I just posted an install guide for the project, and that should walk you through all the required steps to get it up and running. The code is not totally finished (no training wizard yet) but it is 80% complete and comes with a bunch of new features for the Raspberry Pi 2!
Phil, great project. I’ve got a kegerator with 5 taps. Does your build max out at 2, or would it support more kegs?
Thanks!
Thanks Carlos! I don’t think there would be any technical issues with using 5 flow meters, especially if using a raspberry pi 2, but I have not tried personally. The software would also need some love to handle all 5 taps, but I should’ve done most of the heavy lifting for you already with the source available. Let me know if you do try this and hit any stumbles, and I’d love to see the finished product!
How would one add one or more taps to the software?
Also, how do you go from building the source code to a completed project? I have been able to build the program, but I cannot get it to work outside of the IDE. I know this is probably something simple….
First step would be updating the python script to listen on more than the 2 pins it currently uses (external/gpioWFI.py) and for the output to be more relevant (something like “meter 1/2/3/4/5 tick”)
Then you’d need to update the FlowMeterManager.cpp to understand the new python script output, and select the appropriate keg. If you need any help with specific implementations, you can ask here
Phil, I saw question above whether an alternative touch screen (or simple monitor with mouse and keyboard) would work with this build instead of the mimo screen. But I didn’t see an answer. I assume this could be adapted fairly easily to use other displays? Or is the mimo screen an integral part of the build?
Thanks!
Hi Carlos, unfortunately WordPress doesn’t let you reply “inline” to comments 3 layers deep, so my reply is directly below his.
To answer your question, there is nothing about my project that requires a mimo display. I’ve made my application’s UI match the resolution of the mimo, but there is no dependency on that type of display. The application will run on any size display, but you may need to make UI adjustments to fit your sized display better.
Phil, I’ve got the app up and running, but am unable to get the facialrecognition to train or take snaps of the faces it is recognizing. The ‘Start Search’ button doesn’t seem to do anything, nor do the ‘Set as Default’, Delete, Test, save or Exit. The only buttons that respond to clicks are AutoSnap, AutoAdd and IR LEDs, though they don’t seem to generate any action within the program.
Could this be related to the fact that I am manipulating the device with mouse and keyboard rather than a touch-screen MIMO?
Any suggestions on where to troubleshoot?
Also, how do I delete the sample users you have? There doesn’t seem to be a function in the program to delete, and when I tried clearing several of the entries from the users.txt file in the logs folder, the build crashed.
Thanks!
carlos
Do these lines from the application output suggest anything?
QMetaObject::connectSlotsByName: No matching signal for on_startCameraButton_clicked()
QMetaObject::connectSlotsByName: No matching signal for on_saveImageButton_clicked()
QMetaObject::connectSlotsByName: No matching signal for on_startSearchButton_clicked()
QMetaObject::connectSlotsByName: No matching signal for on_deleteImageButton_clicked()
QMetaObject::connectSlotsByName: No matching signal for on_closeButton_clicked()
Hey Carlos, glad you got it running! Unfortunately the areas you just described are where the project is severely lacking, ie, those features are incomplete. I do work on them occasionally, and have a bit of local work I could check in soon, but those areas still need lots of love and tuning. Nothing to do with your mouse or kb. Try clearing out the log file and users file together, leaving just
“{
}”
minus the quotes. Otherwise try examining the error, and using breakpoints in debug mode to see what is crashing.
Phil, just a quick update. I’ve adapted the original source code to fit 5 taps, and have reconfigured the main window GUI. Unfortunately, I’m missing something, as the flow meters are not registering on any of the taps. And the settings for the 5 taps don’t get saved when I restart the program. I’ll keep plugging away at it, but if you have any suggestions, I’m all ears! (I’ll post the code when I resolve these two issues.)
Hey there, just wanted to drop by and say a big thanks for dropping the sources out there, i’m working on adapting it for my 4-tap keezer, as well as unlocking each tap with a solenoid valve after the facial recognition step. Your code base made my life a lot easier, and your code is crazy clean and very object-oriented, which makes it really easy to work with. i’ll post a video of the final result when i’m done. Thanks again 🙂
Thanks Marc! I look forward to your creation!
Hey there, I got quite far in the project, made the app compatible with 4 kegs and got all my hardware. I’m starting to play around with the camera and facial recognition. The training window seems like a work in progress. Did you ever got the facial recognition to work? Right now beside “1 face detected” I can’t do much in there. Thanks!
Hi Marc, nope, the facial rec is only partially completed, and not a full implementation. All that is checked in is face detection, but the pieces should be there to wire up recognition, I just never got around to finishing it. That is one area that certainly needs some love, I just don’t have the spare time lately. 😦
Hey there, me again. So I just wanted to pass by and give you an update on my project. My revision of the software is now complete, I have 4 taps hooked up and counting with the flow meters, using pass code authentication since facial recognition is not working, all lines are locked by a solenoid valve. To pour a beer, you must click on the beer you want from the home page, enter your password to login, and when authentication is successful, the selected valve opens. You can also select a fixed portion from the pouring window and the pouring will stop when the desired quantity has been poured, giving the perfect quantity every time. There are also 4 RGB LED status lights, one for each tap. blue=idle, red=keg empty, green= tap unlocked and ready to pour.
I plan to add a calibration module eventually where I can calibrate the meters for the density of each beer to achieve more precise inventory counting without having to touch the code. I’m also working at encrypting the pass codes because right now they’re saved in clear text in the users file.
So again, a big thanks for your code base, it really helped me realize my project without having to start from scratch, I don’t have that much spare time 😉 I will do a youtube video of the finished project eventually and will give you credit for the work, as well as pointing out your blog.
That sounds awesome! I’m excited to see the video demonstration!
Hey Phil, just realised like a year later I never posted a video of my modified version of your SmartKeezer, so here it is : https://www.facebook.com/thepunisher713/videos/10158067993565302/ Video is public so you should see it. It doesn’t go deep in the settings menus but you get the Idea of day-to-day usage. It’s working great by the way, I haven’t touched the code in ages!
Thanks for the facebook video! Looks very cool!
What a cool project. I am a complete noob when it comes to this type of thing. Is it possible to use a tablet instead of the touchscreen?
Thanks
Thanks Ron! This was created specifically for a raspberry pi, so unless your tablet runs raspbian, it would be quite a bit of work to get it running unfortunately!
Pingback: Smart Kegenerator, el dispositivo para medir cuánta cerveza de barril bebes tú y tus amigos - Alfa Beta Juega
Everything is very open with a precise explanation of the challenges.
It was really informative. Your site is extremely helpful.
Thank you for sharing!
Pingback: Bu Raspberry Pi LED Dart Tahtası Noktasında - Dünyadan Güncel Teknoloji Haberleri | Teknomers
Pingback: This Raspberry Pi LED Dartboard is On Point - AKEX.ca
Pingback: This Raspberry Pi LED Dartboard is On Level – PiGurus
Pingback: This Raspberry Pi LED Dartboard is On Point – 321update: UK News – The latest headlines
Pingback: This Raspberry Pi LED Dartboard is On Point | eSocialNews
Pingback: This Raspberry Pi LED Dartboard is On Point – Digitalcrowd
Pingback: This Raspberry Pi LED Dartboard is On Point – Netcomputingnews